 Jan 02, 2022
in
Jan 02, 2022
in
There are lots of tutorials online about setting up Wireguard on a Raspberry Pi, this is just how I chose to do it. However, the two things my previous installs were missing were reliability (my previous install corrupted the SD card after running for about a year) and a nice web UI that could monitor the amount of traffic per client. So this tutorial includes:
- Installing Wireguard
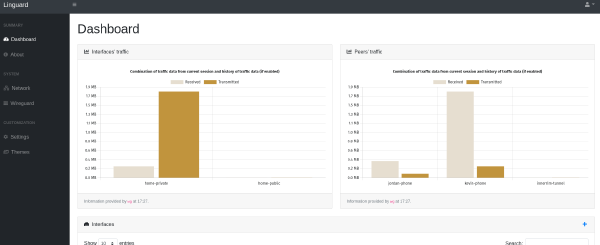
- Installing Linguard - A nice web UI that monitors traffic and allows adding/modifying interfaces and firewall rules nicely.
- Installing log2ram - Utility that limits writing system logs to the SD card to extend it’s life.
Install Wireguard
- Install Raspberry Pi OS:
- Using their imager tool:
- Download
rpi-imagerfrom your package manager or from the RPi website. - Using
rpi-imagerinstall Raspberry Pi OS Lite to your SD card with the following options:- Create user (in my case
wg). - Allow ssh.
- Set the hostname (in my case
wireguard).
- Create user (in my case
- Download
- Using
dd:- Download the Raspberry Pi OS Lite image from the RPi website.
- Flash the image to your SD card using something like
sudo dd if=/path/to/os.img of=/dev/SD_CARD_PATH conv=fsync bs=64K status=progress. Theconv=fsyncinsures the entire contents are written to the card itself by the end of theddoperation, there’s a good explanation here. - Use
echo 'mypassword' | openssl passwd -6 -stdinto created a fileuserconf.txtin the boot partition of new SD card with the formatusername:encrypted-password. I made the userwg. - Use
touch sshin the root of the boot partition of the SD card to allow ssh on first boot. - Edit
/etc/hostto be the desired hostname (in my casewireguard)
- Using their imager tool:
- Boot up the pi and ssh into it.
- Run a
sudo apt updateandsudo apt upgrade. - Run
sudo apt install wireguard. - You don’t have to do this yet, but once I got interfaces set up I wasn’t able to connect from the client to devices on the network besides the interface itself. So I ran
sudo sysctl -w net.ipv4.ip_forward=1in order to make my wireguard interfaces route properly. You can run it at this point to ensure that doesn’t happen later.
Install Linguard
- Download the latest release from the Linguard github.
- I had to use
sudo apt install libopenjp2-7in order to have all the dependencies for Libguard 1.1. - Untar the source you downloaded and run the
install.shscript. - Navigate to
wireguard.lan:8080(of course using whatever hostname you set up) and complete the initial Linguard setup there. - The first thing is to go to the Settings page of Linguard to set your endpoint address. This is the address that your clients will use to connect to your VPN. In my case I was using a dynamic DNS service to point to my home address, so I put in my DDNS URL.
- Choose to setup a new interface by clicking the
+icon in the upper right of the Interfaces box. - Give the interface an appropriate name and description, I have one I use for personal devices to have direct VPC access (I call it
home-private) and one I use for a tunnel out to a VPS that I’ll describe in another post (I call ithome-public). - Ensure the gateway is set to the network you want the VPN to connect your devices to, on a Pi that will either be the
eth0orwlan0network. - The rest can be left mostly default unless you already know you want some different firewall rules within this VPN interface, or if you want to resize the subnet to be more appropriate. I usually make it a
/29just because it’s unlikely I’ll ever have more than 7 devices on the interface. - Create a new peer (ex. a phone that will connect to the VPN) by clicking the
+icon in the upper right of the Peers box. - Choose which interface it should use (ex.
home-private), as well as the IP it should have. If you have custom DNS set up, this is your chance to tell it to use your internal DNS instead of the default Google DNS. - Now from the dashboard you can either hit the Download icon on the peer to download the wireguard settings which you can move to your phone/laptop/computer. Or you can hit the Edit icon and use the QR code generator if you’re moving it to a device with the ability to scan QR codes.
Install log2ram
- Installing log2ram is pretty simple, you can follow the instructions on their github. But just in case here’s what they have on their now (v1.6.1).
echo "deb [signed-by=/usr/share/keyrings/azlux-archive-keyring.gpg] http://packages.azlux.fr/debian/ bullseye main" | sudo tee /etc/apt/sources.list.d/azlux.list
sudo wget -O /usr/share/keyrings/azlux-archive-keyring.gpg  https://azlux.fr/repo.gpg
sudo apt update
sudo apt install log2ram
- Reboot the pi.
- Ensure it’s running using
systemctl status log2ramand you can also inspect the log in RAM using, if thedfcommand below doesn’t output anything then it’s not working.
# df -h | grep log2ram
log2ram          40M  532K   40M   2% /var/log