 Jul 01, 2022
in
Jul 01, 2022
in
Do you want to more-securely expose your self-hosted services to the internet? Do you like the idea of products like Cloudflare Tunnel, but would prefer more control over your infrastructure? Then this setup is for you!
The basic idea is to host a reverse proxy on a basic Virtual Private Server (VPS) with a public IP, which then proxies traffic through a Wireguard connection to your home network.
| Pros | Cons |
|---|---|
| - Hides your home IP from the world, since the VPS is the only one that needs to know it | - No built-in DDoS protection like Cloudflare provides |
| - Very easy to customize and implement your own protections | - Takes a bit more work (but you learn more!) |
| - Only dependent on VPS staying up, not on SaaS |
Prerequisites
You’ll need the following already set up:
- A public domain
- A Wireguard server set up on your home network (see my setup here)
- Some self-hosted service you want to expose to the internet (e.g. I self-host Foundry Virtual Tabletop for playing DnD online)
- A Virtual Private Server (VPS) that you can use to host your public endpoint. I set up a simple VPS with 1 CPU, 512 MB RAM, and 10 GB SSD running Ubuntu. So far it’s only cost me $2.26 over the past 3 months.
Setup Wireguard on VPS
First thing’s first, once you can ssh to your VPS and have set up a non-root user, install wireguard and some networking tools (your default VPS install may already these).
sudo apt install wireguard net-tools openresolv
After that we can set up a separate network interface on the wireguard server that will be used just for traffic coming through the tunnel. If you glanced at my previous Wireguard tutorial, you’ll have seen how I set up Linguard to manage my interfaces through a web GUI. Here’s a screenshot of my home-public interface.
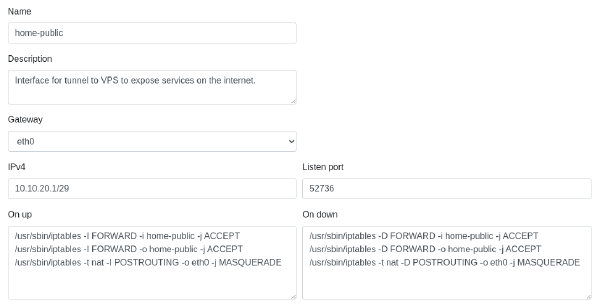
I chose to make this a small /29 subnet since it should only ever have 2 devices on it. The listening port is random, and in my case is just the port of the Raspberry Pi where Wireguard is running, my router does forwarding from a separate port. The iptables rules insert rules (-I) on the interface start, and delete them (-D) on interface stop. The -i and -o stand for in-interface and out-interface, meaning traffic can be received and sent through the specified interface. The rule containing MASQUERADE makes the traffic coming from this interface appear like it’s coming from the Raspberry Pi to the rest of the network.
Once you have the interface set up you can export the wireguard .conf file and move it to your VPS. Note that the AllowedIPs option in the conf file sets up routes on the interface. By default it just contains the Wireguard network we set up (10.10.20.1/29). So, if you want to access devices on your home network you need to route those IPs properly. In my case I only want the VPS to mirror services running on my home server located at 192.168.1.8, so I’ll only include a route to that IP. This also limits exposure of the VPS to my internal network. It should look something like this:
[Interface]
PrivateKey = some_random_private_key_here
Address = 10.10.20.2
DNS = 8.8.8.8

[Peer]
PublicKey = some_random_public_key_here
AllowedIPs = 10.10.20.1/29, 192.168.1.8/32
Endpoint = your_home_ip_or_hostname:your_vpn_port
Place the file in /etc/wireguard/TUNNEL_NAME.conf on the VPS. It can now be turned off/on with the command:
sudo wg-quick up/down TUNNEL_NAME
Once it is up, you should now have your tunnel network interface and be able to ping your home wireguard VPN server at 10.10.20.1 (if you used the same addressing scheme).
Setup Firewall
Now that we have a Wireguard network setup, let’s secure it a bit more. We’re only going to allow our Wireguard server, as well as machines from our home IP address, to connect to port 22 for SSH. We’ll also block everything except ports 80 and 443 from the rest of the world. On my VPS, ufw was installed and enabled by default, so you may have to install it and set it to run on boot. It also enabled access to port 22 from anywhere for initial setup.
sudo ufw deny from anywhere to any 22
sudo ufw allow from 10.10.20.1 to any port 22
sudo ufw allow from YOUR_IP_HERE to any port 22
sudo ufw allow from anywhere to any port 80
sudo ufw allow from anywhere to any port 443
You can check it all looks good with sudo ufw status.
Setup Caddy Reverse Proxy
Our final step is setting up our reverse proxy to provide nice URLs for our internally hosted services and expose them to the public internet. I already had a Caddy installed to provide nice URLs on my local network, so I decided to use that on the VPS as well. I’ll skip how to install Caddy and just go into the config, because that’s the interesting part. Here’s my internal network’s Caddyfile:
(forward_headers) {
    header_up X-Forwarded-Ssl on
    header_up Host {host}
    header_up X-Real-IP {remote}
    header_up X-Forwarded-For {remote}
    header_up X-Forwarded-Port {server_port}
    header_up X-Forwarded-Proto {scheme}
    header_up X-Url-Scheme {scheme}
    header_up X-Forwarded-Host {host}
}

(compression) {
  encode gzip
}

MY_INTERNAL_DOMAIN.dev {
        root * /usr/share/caddy
}

nas.MY_INTERNAL_DOMAIN.dev {
    tls /data/caddy/certificates/acme-v02.api.letsencrypt.org-directory/nas.MY_INTERNAL_DOMAIN.dev/nas.MY_INTERNAL_DOMAIN.dev.crt /data/caddy/certificates/acme-v02.api.letsencrypt.org-directory/nas.MY_INTERNAL_DOMAIN.dev/nas.MY_INTERNAL_DOMAIN.dev.key

    reverse_proxy http://synology-nas.lan:5500 {
        import forward_headers
    }
    import compression
}

foundry.MY_INTERNAL_DOMAIN.dev {
    tls /data/caddy/certificates/acme-v02.api.letsencrypt.org-directory/foundry.MY_INTERNAL_DOMAIN.dev/foundry.MY_INTERNAL_DOMAIN.dev.crt /data/caddy/certificates/acme-v02.api.letsencrypt.org-directory/foundry.MY_INTERNAL_DOMAIN.dev/foundry.MY_INTERNAL_DOMAIN.dev.key

    reverse_proxy http://synology-nas.lan:30000 {
        import forward_headers
    }
    import compression
}

pihole.MY_INTERNAL_DOMAIN.dev  {
    tls /data/caddy/certificates/acme-v02.api.letsencrypt.org-directory/pihole.MY_INTERNAL_DOMAIN.dev/pihole.MY_INTERNAL_DOMAIN.dev.crt /data/caddy/certificates/acme-v02.api.letsencrypt.org-directory/pihole.MY_INTERNAL_DOMAIN.dev/pihole.MY_INTERNAL_DOMAIN.dev.key

    rewrite / /admin

    reverse_proxy http://synology-nas.lan:10080 {
        import forward_headers
    }
    import compression
}

huginn.MY_INTERNAL_DOMAIN.dev {
    tls /data/caddy/certificates/acme-v02.api.letsencrypt.org-directory/huginn.MY_INTERNAL_DOMAIN.dev/huginn.MY_INTERNAL_DOMAIN.dev.crt /data/caddy/certificates/acme-v02.api.letsencrypt.org-directory/huginn.MY_INTERNAL_DOMAIN.dev/huginn.MY_INTERNAL_DOMAIN.dev.key

    reverse_proxy http://synology-nas.lan:8091 {
        import forward_headers
    }
    import compression
}
And here’s an excerpt from the VPS’s Caddyfile:
forward_headers) {
	header_up X-Forwarded-Ssl on
	header_up Host {host}
	header_up X-Real-IP {remote}
	header_up X-Forwarded-For {remote}
	header_up X-Forwarded-Port {server_port}
	header_up X-Forwarded-Proto {scheme}
	header_up X-Url-Scheme {scheme}
	header_up X-Forwarded-Host {host}
}

(compression) {
	encode gzip
}

MY_INTERNAL_DOMAIN.dev {
	root * /usr/share/caddy
}

nas.MY_INTERNAL_DOMAIN.dev {
	root * /usr/share/caddy
}

foundry.MY_INTERNAL_DOMAIN.dev {
    reverse_proxy http://192.168.1.8:30000 {
        import forward_headers
    }
    import compression
}

pihole.MY_INTERNAL_DOMAIN.dev {
	root * /usr/share/caddy
}

huginn.MY_INTERNAL_DOMAIN.dev {
	root * /usr/share/caddy
}
Together these configs show two useful things:
- Exposing a service to the public internet (Foundry VTT in the example above)
- Provisioning a Let’s Encrypt certificate for all of our subdomains, even if we’re not exposing them to the public internet (“nas”, PiHole, and Huginn in the example above)
In the Foundry VTT entries, you can see the external config contains the reverse_proxy directive that forwards to my home server IP. The route to this IP was added in the Wireguard config above. A similar entry is inside the internal config, the only difference is it specifies the location of the TLS certificate to use for HTTPS. My goal was to access Foundry VTT from the same URL, using the same certificate, but preferrably not routing all the way through the VPS if I’m just sitting at home. So, I set up the following cronjob to run once a day. It copies the certificate from the VPS back to my home server, so after adding a DNS entry for MY_INTERNAL_DOMAIN on my local network, it all works efficiently!
scp -r -i "~/.ssh/id_ed25519" root@MY_VPS_IP:/var/lib/caddy/.local/share/caddy/certificates/acme-v02.api.letsencrypt.org-directory/* /volume1/docker/caddy/data/caddy/certificates/acme-v02.api.letsencrypt.org-directory/
chmod 755 -R /volume1/docker/caddy/data/caddy/certificates/acme-v02.api.letsencrypt.org-directory/
scp -r -i "~/.ssh/id_ed25519" root@MY_VPS_IP:/etc/caddy/Caddyfile /volume1/docker/caddy/etc/caddy/Caddyfile_remote_backup
The nice thing about this is we can use the setup to provide Let’s Encrypt certificates and HTTPS for our internal-only services as well. We just don’t add any forwarding rules on the VPS Caddy config. In this case it’s just pointing to an html file at /usr/share/caddy/index.html that has a generic 404 error screen. No more annoying “Do you trust this website?” on our internal services!
NOTE
The only problem with this setup that I’ve found is my home IP is not static, so the firewall rule we set occasionally has to be changed. You could relax the firewall rules, but I’d rather keep it secure and just manually edit the rule through my VPS console when I notice that it’s lost connection. It’s only happened once in the past year, so not a big deal!
Alternatively, you could try and guess some subnet your ISP will keep you inside, or you could just keep port 22 open and rely on your SSH key to keep everything secure.